![]()
Products


We are actively taking measures to improve product quality levels.
Applications


Why Hamamatsu?
Resources


Support


Our company


Investors


United States (EN)
Select your region or country.
Active Silicon interface
Connectivity
Camera is not detected by application
Is the camera visible in the Device Manager?
(Windows 10) Right-click on Start (or Windows key) and select Device Manager in the menu. Or right-click on This PC, click Manage and then select Device Manager.
(Windows 8.1) Press the Windows key + X and select Device Manager.
(Windows 7) Right-click on My Computer, click Manage and then select Device Manager.
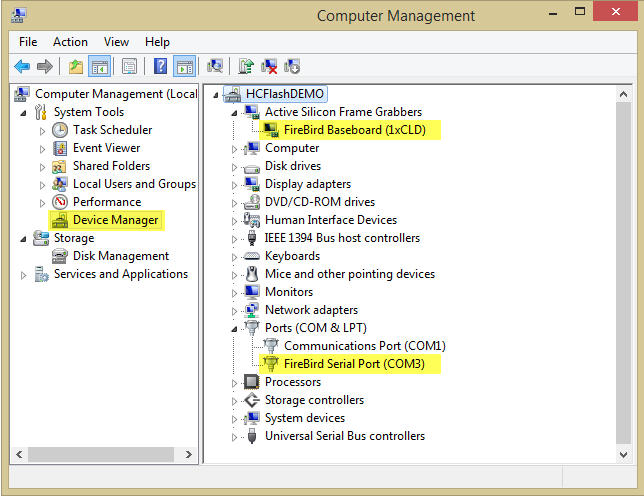
What am I looking for in the Device Manager?
(Camera Link) The board is listed under Active Silicon Frame Grabbers as the FireBird Baseboard and under Ports (COM & LPT) as FireBird Serial Port (COM#). The camera make and model numbers are not displayed.
Interface board is not recognized in the Device Manager
Is DCAM-API installed?
The current version of DCAM-API is available for download at http://dcam-api.com/. Prior to downloading DCAM-API, please consult the Compatibility Note to make sure that the camera, Active Silicon board and OS are supported in the current release. If they are not, go to the DCAM-API Archive to see which version of DCAM-API to download.
Note: Before installing the Active Silicon driver, make sure that the camera is turned off.
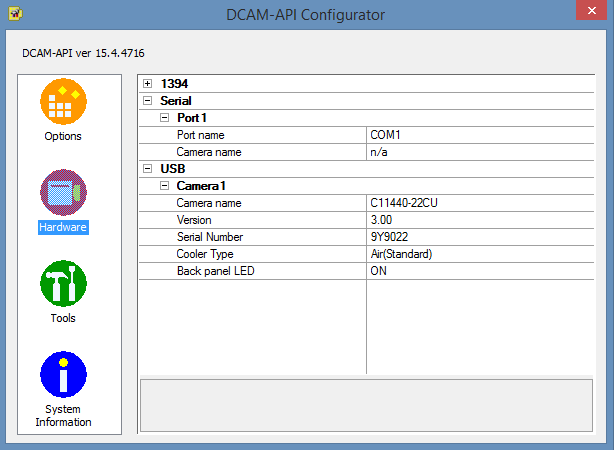
Is the camera detected by the DCAM-API Configurator?
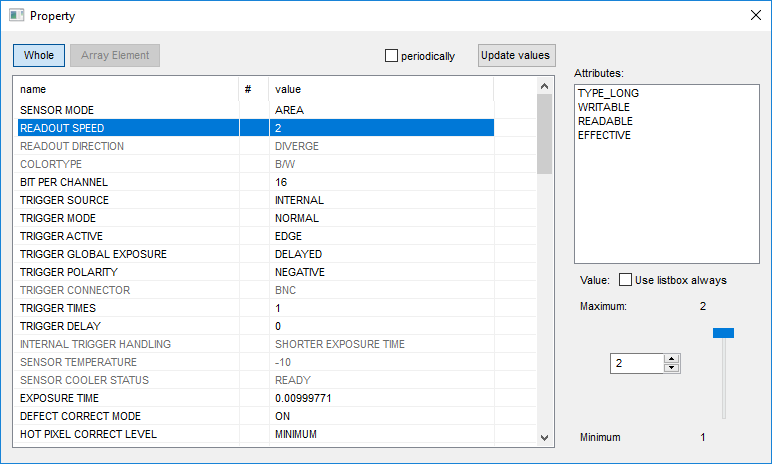
1. Launch DCAM-API, click Tools and select DCAM Configurator.
2. (Options) The interface should be listed and Enable displayed to the right. To change the status, click the right side of the column to display the drop-down list and select Enable or Disable.
3. (Hardware) When the camera is detected, it will be displayed under the interface.
Is the camera detected by ExCap4?
1. Launch DCAM-API, click Tools and select ExCap4.
2. If the camera is detected, ExCap4 will open with the camera model displayed in the top left corner of the application window.
3. Click the Cont. icon to run the camera, click the FPS Rate icon to display the frame rate and the Prop icon to change the exposure time and other properties.
4. Click Abort to stop.
If the camera is not detected by DCAM-API, please check the following:
1. Make sure that the camera is powered on and properly connected, i.e., the cables are securely connected to the proper ports labeled on the back of the camera and interface board.
a. Power off the camera before connecting, disconnecting or adjusting the cables.
2. Go to the Control Panel, select Programs and Features (or Add or Remove Programs) and verify if there are multiple versions of DCAM-API installed.
a. If so, power off the camera and remove all of the version of DCAM installed on the system including the version that was just installed. Do not use the Control Panel to uninstall; rather use the uninstall.exe found in the appropriate interface driver folder in the DCAM files.
b. Once all of the DCAM-API drivers have been uninstalled, reboot the system and then reinstall the appropriate driver.
3. Make sure that the system is current with the latest Windows Updates.
a. Check for Windows Updates, press the Windows logo key + Pause to display the System Properties dialog and select Windows Update located in the lower left corner below See Also.
Camera is detected by the application but unable to acquire images
Make sure that the cables are properly connected, i.e., the cables are securely connected to the proper ports labeled on the back of the camera and interface board.
Power off the camera before connecting, disconnecting or adjusting the cables.
Check the Firmware version of the Active Silicon board.
1. Launch DCAM-API, click Others and select ASLVER.
2. The ASLVER dialog displays information about the frame grabber and the camera if one is connected.
3. If there is a firmware update available, the Update button will be visible; otherwise it is grayed out.
4. Before updating the frame grabber firmware, click the ellipsis icon to the right of the ASLVER button and select the ASLVER Manual.
5. Follow the instruction in the manual to update the firmware, and make sure that the pin is in the proper position for the board (there are pictures) before starting.
Verify the camera is in the desired capture mode.
• The capture mode is determined by the application running the camera.
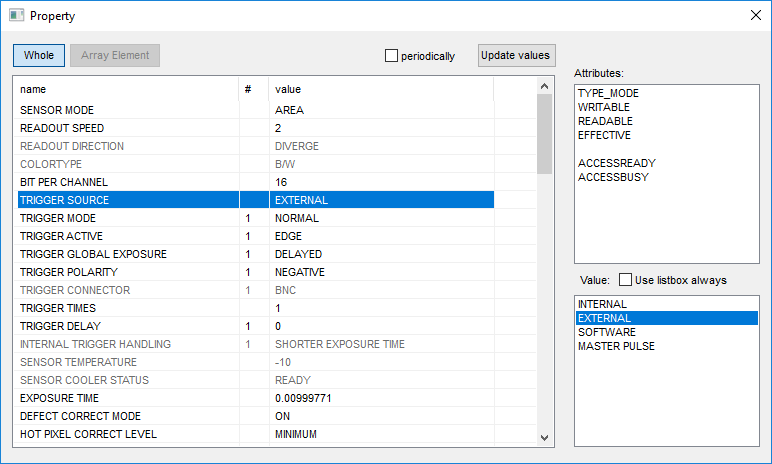
• (ExCap4) Launch ExCap4, click the Prop icon and navigate to Trigger Source. Select the appropriate mode if not selected and try to acquire images.
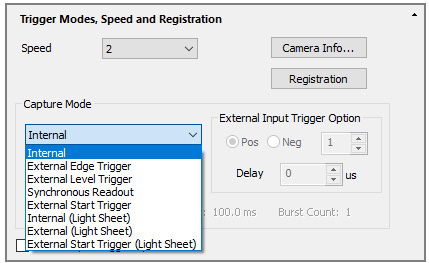
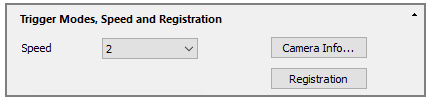
• (HCImage Live) Launch HCImage Live, expand Trigger Modes, Speed and Registration and verify the Capture Mode.
Installed the latest updates for Windows?
Check for Windows Updates, press the Windows logo key + Pause to display the System Properties dialog and select Windows Update located in the located in the lower left corner below See Also.
Speed
Unable to achieve spec frame rate
Verify that the camera is set to the fastest speed (highest number)
• The speed is determined by the application running the camera.
• (ExCap4) Launch ExCap4, click the Prop icon and navigate to Readout Speed. Select the appropriate speed if not selected and try to acquire images.
• (HCImage Live) Launch HCImage Live, expand Trigger Modes, Speed and Registration and verify the Speed.
Make sure that the system is current with the latest Windows Updates.
Check for Windows Updates, press the Windows logo key + Pause to display the System Properties dialog and select Windows Update located in the located in the lower left corner below See Also.
Have the BIOS settings been updated?
1. Disable Processor C-statecontrol to force C0 state for all processors.
2. Enable Intel Turbo Boost.
3. Disable Intel SpeedStep if allowed with Turbo Boost Enabled. Enable Turbo Boost may mutually exclude disabling SpeedStep.
4. Enable Intel Hyper-Threading.
Verify PC Recommendations and PCIe slot configurations.
- Confirmation
-
It looks like you're in the . If this is not your location, please select the correct region or country below.
You're headed to Hamamatsu Photonics website for US (English). If you want to view an other country's site, the optimized information will be provided by selecting options below.
In order to use this website comfortably, we use cookies. For cookie details please see our cookie policy.
- Cookie Policy
-
This website or its third-party tools use cookies, which are necessary to its functioning and required to achieve the purposes illustrated in this cookie policy. By closing the cookie warning banner, scrolling the page, clicking a link or continuing to browse otherwise, you agree to the use of cookies.
Hamamatsu uses cookies in order to enhance your experience on our website and ensure that our website functions.
You can visit this page at any time to learn more about cookies, get the most up to date information on how we use cookies and manage your cookie settings. We will not use cookies for any purpose other than the ones stated, but please note that we reserve the right to update our cookies.
1. What are cookies?
For modern websites to work according to visitor’s expectations, they need to collect certain basic information about visitors. To do this, a site will create small text files which are placed on visitor’s devices (computer or mobile) - these files are known as cookies when you access a website. Cookies are used in order to make websites function and work efficiently. Cookies are uniquely assigned to each visitor and can only be read by a web server in the domain that issued the cookie to the visitor. Cookies cannot be used to run programs or deliver viruses to a visitor’s device.
Cookies do various jobs which make the visitor’s experience of the internet much smoother and more interactive. For instance, cookies are used to remember the visitor’s preferences on sites they visit often, to remember language preference and to help navigate between pages more efficiently. Much, though not all, of the data collected is anonymous, though some of it is designed to detect browsing patterns and approximate geographical location to improve the visitor experience.
Certain type of cookies may require the data subject’s consent before storing them on the computer.
2. What are the different types of cookies?
This website uses two types of cookies:
- First party cookies. For our website, the first party cookies are controlled and maintained by Hamamatsu. No other parties have access to these cookies.
- Third party cookies. These cookies are implemented by organizations outside Hamamatsu. We do not have access to the data in these cookies, but we use these cookies to improve the overall website experience.
3. How do we use cookies?
This website uses cookies for following purposes:
- Certain cookies are necessary for our website to function. These are strictly necessary cookies and are required to enable website access, support navigation or provide relevant content. These cookies direct you to the correct region or country, and support security and ecommerce. Strictly necessary cookies also enforce your privacy preferences. Without these strictly necessary cookies, much of our website will not function.
- Analytics cookies are used to track website usage. This data enables us to improve our website usability, performance and website administration. In our analytics cookies, we do not store any personal identifying information.
- Functionality cookies. These are used to recognize you when you return to our website. This enables us to personalize our content for you, greet you by name and remember your preferences (for example, your choice of language or region).
- These cookies record your visit to our website, the pages you have visited and the links you have followed. We will use this information to make our website and the advertising displayed on it more relevant to your interests. We may also share this information with third parties for this purpose.
Cookies help us help you. Through the use of cookies, we learn what is important to our visitors and we develop and enhance website content and functionality to support your experience. Much of our website can be accessed if cookies are disabled, however certain website functions may not work. And, we believe your current and future visits will be enhanced if cookies are enabled.
4. Which cookies do we use?
There are two ways to manage cookie preferences.
- You can set your cookie preferences on your device or in your browser.
- You can set your cookie preferences at the website level.
If you don’t want to receive cookies, you can modify your browser so that it notifies you when cookies are sent to it or you can refuse cookies altogether. You can also delete cookies that have already been set.
If you wish to restrict or block web browser cookies which are set on your device then you can do this through your browser settings; the Help function within your browser should tell you how. Alternatively, you may wish to visit www.aboutcookies.org, which contains comprehensive information on how to do this on a wide variety of desktop browsers.
5. What are Internet tags and how do we use them with cookies?
Occasionally, we may use internet tags (also known as action tags, single-pixel GIFs, clear GIFs, invisible GIFs and 1-by-1 GIFs) at this site and may deploy these tags/cookies through a third-party advertising partner or a web analytical service partner which may be located and store the respective information (including your IP-address) in a foreign country. These tags/cookies are placed on both online advertisements that bring users to this site and on different pages of this site. We use this technology to measure the visitors' responses to our sites and the effectiveness of our advertising campaigns (including how many times a page is opened and which information is consulted) as well as to evaluate your use of this website. The third-party partner or the web analytical service partner may be able to collect data about visitors to our and other sites because of these internet tags/cookies, may compose reports regarding the website’s activity for us and may provide further services which are related to the use of the website and the internet. They may provide such information to other parties if there is a legal requirement that they do so, or if they hire the other parties to process information on their behalf.
If you would like more information about web tags and cookies associated with on-line advertising or to opt-out of third-party collection of this information, please visit the Network Advertising Initiative website http://www.networkadvertising.org.
6. Analytics and Advertisement Cookies
We use third-party cookies (such as Google Analytics) to track visitors on our website, to get reports about how visitors use the website and to inform, optimize and serve ads based on someone's past visits to our website.
You may opt-out of Google Analytics cookies by the websites provided by Google:
https://tools.google.com/dlpage/gaoptout?hl=en
As provided in this Privacy Policy (Article 5), you can learn more about opt-out cookies by the website provided by Network Advertising Initiative:
http://www.networkadvertising.org
We inform you that in such case you will not be able to wholly use all functions of our website.
Close